Using RetroArch
Work in progress guide. Please expand upon it.
Contents
Basic Usage (Windows)
After downloading RetroArch,
start up retroarch.exe.
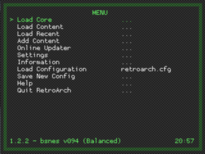
To launch a game, select the emulator core you'd like to use under Core, and select a ROM under Load Game.
For more convenient ROM selection, setup your browser directory under Path Options.
Installing RetroArch on Linux
Ubuntu
First, add the PPA for hunter-kaller/ppa (instructions here), then type the following into a terminal:
sudo apt-get update

sudo apt-get install retroarch

sudo apt-get install <corename>
Replace <corename> with the name of the package the core is available in. You can see all of the cores available to you either in your package manager (e.g. Synaptic, Software Center) or by visiting Launchpad.
https://launchpad.net/~hunter-kaller/+archive/ppa
Other Distros
You will have to compile from source. For Arch Linux, there are AUR packages that simplify this process, although it is not incredibly difficult otherwise. The most important part is making sure you have all the dependencies.
Dependencies: (refer to your distro's wiki or package manager for exact package names)
- pkgconfig
- OpenGL headers (should be on most distros by default, if not try installing libgl/mesa development package
Optional
- libxml2 - For XML shaders and cheat support
- freetype - TTF font rendering
- ffmpeg/libavcodec - FFmpeg recording
- nvidia-cg-toolkit - Cg shaders
Using RetroArch
RetroArch has a robust CLI for those who prefer the command line, there are also many pages which should have been installed by default for retro-arch, retroarch-joyconfig and others. If you use the CLI be sure to configure your retroarch.cfg file before first use. This config is well commented so each option can be fully understood. Use retroarch-joyconfig command for simplified input setup. RetroArch can auto-detect inputs, which is a great feature to simplify playing with multiple/different controllers (refer to "man retroarch-joyconfig" for details). The retroarch.cfg file should be located in /etc/retroarch.cfg, your home folder or the directory where RetroArch was installed depending on your distro and compilation setup.
General Setup/Usage
RGUI Controls
Default keys for the keyboard are: x (confirm), z (back) and the arrow keys. If you're using an XInput (xbox 360) controller, your controller should already be set-up.
BIOS
If you are going to play in a system that needs a BIOS (e.g. PS1), place the BIOS files in RetroArch's 'system' directory.
Mednafen is very picky about which BIOS to use. The ones that you might need are:
- scph5500.bin
- scph5501.bin
- scph5502.bin
Disc images
Mednafen requires you to load games through CUE sheets. Ensure that the CUE sheet is properly set up in order for the game to run. See the Cue sheet (.cue) for more.
Mupen64Plus
The following files need to be placed in the System folder:
- RiceVideoLinux.ini
- Glide64mk2.ini
Download them here.
Super Game Boy
Download these SGB-capable bsnes cores, then download this, place it in the RetroArch folder, and rename it as "sgb.boot.rom". Using Phoenix, under File > Special ROM, select a Super Game Boy ROM (they will all basically work) and a Game Boy ROM. Finally, under ROM type, select Super GameBoy, make sure you have the bsnes core you downloaded selected, and play.
Dual Analog Controllers
PS1 games often used a set of default remappings if they didn't support it directly. Some games used both analogs as the D-pad, RetroArch doesn't support that though. Dual analogs only work in games that fully supported them, such as Ape Escape. To use dual analog for such games, go to Input Options, and change Device Type to JoyPad w/ Analog.
Transfer PS1 Memory Card Files
Mednafen creates memory card files for each individual game, in contrast to PCSX-R/ePSXe where all game saves are stored into 2 memory card files. To transfer memory card files from PCSX-R/ePSXe to RetroArch:
- Start game in RetroArch.
- Go to system folder. Copy the names of the .mcr files created for the game.
- Delete them.
- Rename the files you want to transfer with the names of the RetroArch memcard files.
- Place the new ones in the system folder.
Disk Changing
To changes disks in-game, go to Disk Options > Disk Image Append.
Some games like Metal Gear Solid require the disk tray to be opened before changing disks. To do this, change 'Disk Index' to 'No Disk' first. =
Building from source
- Main article: Building RetroArch
Libretro-super is a series of scripts used to ease the compilation and installation of each and every libretro emulation core and RetroArch itself. Thus this is the simplest route to a fully functional installation. If you need or want to build each core individually then you can refer to the build-common.sh script for direction.
git clone git://github.com/libretro/libretro-super.git
cd libretro-super
sh libretro-fetch.sh
sh libretro-build.sh
sh libretro-install.sh <path where you'd like RetroArch installed>
Hotkeys
- F1 - Open RGUI
- F2 - Save state
- F4 - Load state
- F8 - Take Screenshot
- F9 - Mute Audio
- F11 - Hide Cursor
- Space - Turn off Frame Limiter
Problems and Solutions
RGUI high frame rate
RGUI can run at a very, very high frame rate, like 500.
Command prompt running and closing itself upon running retroarch.exe
Open up retroarch.cfg using Notepad. Inside, you should find
config_save_on_exit = "true"
Now, under it, write
video_driver = "d3d9" or
video_driver = "gl"
