Difference between revisions of "Using RetroArch"
| Line 10: | Line 10: | ||
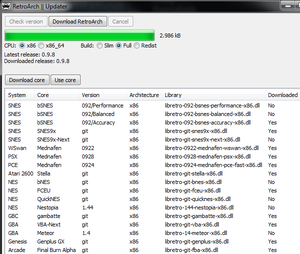
[[File:RA_updater.png|thumb|RetroArch's Updater]] From there, click 'Check Version'. This checks if everything is up-to-date (you have to do this every time you use the updater). Double-click on a core to start downloading it. | [[File:RA_updater.png|thumb|RetroArch's Updater]] From there, click 'Check Version'. This checks if everything is up-to-date (you have to do this every time you use the updater). Double-click on a core to start downloading it. | ||
| − | To launch a game, select the emulator core you'd like to use under 'libretro core path', and the appropriate ROM under 'Normal ROM path'. Make sure that 'retroarch.exe' is selected under 'RetroArch path', and click 'Start RetroArch'. | + | To launch a game, select the emulator core you'd like to use under 'libretro core path', and the appropriate ROM under 'Normal ROM path'. Make sure that 'retroarch.exe' is selected under 'RetroArch path', and click 'Start RetroArch'.[[File:RA_System_Directory.png|right|250px]] |
| + | |||
| + | ==Linux== | ||
| + | |||
| + | |||
| + | |||
| + | ==OSX== | ||
| + | |||
| + | |||
| + | |||
==Bios== | ==Bios== | ||
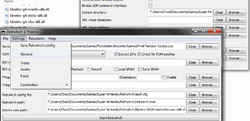
| − | If you are going to play in a system that needs a BIOS, there's a bit more setup required. | + | If you are going to play in a system that needs a BIOS, there's a bit more setup required. Go to 'System > General' and change the 'System directory' to where ever you'd like and place the BIOS files in there. |
| − | |||
| − | |||
In addition, systems like the PSX require you to load games through CUE sheets. See the [[Cue sheet (.cue)]] for more. | In addition, systems like the PSX require you to load games through CUE sheets. See the [[Cue sheet (.cue)]] for more. | ||
| Line 27: | Line 34: | ||
<li class="de2">scph5502.bin</li> | <li class="de2">scph5502.bin</li> | ||
</ul> | </ul> | ||
| − | |||
| − | |||
| − | |||
| − | |||
| − | |||
| − | |||
==Super Game Boy== | ==Super Game Boy== | ||
Revision as of 04:38, 6 August 2013
Windows
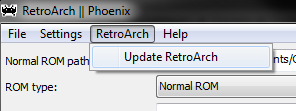
After downloading RetroArch, run 'retroarch-phoenix.exe' and then go to 'RetroArch > Update RetroA
rch' to start downloading emulation cores.
From there, click 'Check Version'. This checks if everything is up-to-date (you have to do this every time you use the updater). Double-click on a core to start downloading it. To launch a game, select the emulator core you'd like to use under 'libretro core path', and the appropriate ROM under 'Normal ROM path'. Make sure that 'retroarch.exe' is selected under 'RetroArch path', and click 'Start RetroArch'.
Linux
OSX
Bios
If you are going to play in a system that needs a BIOS, there's a bit more setup required. Go to 'System > General' and change the 'System directory' to where ever you'd like and place the BIOS files in there.
In addition, systems like the PSX require you to load games through CUE sheets. See the Cue sheet (.cue) for more.
Mednafen prefers:
- scph5500.bin
- scph5501.bin
- scph5502.bin
Super Game Boy
Download these SGB-capable bsnes cores. Then download this, place it in the RetroArch folder, and rename it as "sgb.boot.rom". Now on RetroArch, under File > Special ROM, select a Super Game Boy ROM (they will all basically work) and a Game Boy ROM. Finally, under ROM type, select Super GameBoy, make sure you have the bsnes core you downloaded selected, and play.
Transfer PS1 memcard files
To transfer memcard files:
1. Start game in RA.
2. Go to system folder. Copy name(s) of mem cards created for the game.
3. Delete them.
4. Rename the mem card files you want to transfer with the names of the RA mem files.
5. Place the new ones in the system folder.


