Difference between revisions of "Using RetroArch"
(→Disk Changing) |
(→General Setup) |
||
| Line 77: | Line 77: | ||
[[Mednafen]] requires you to load games through CUE sheets. Ensure that the CUE sheet is properly set up in order for the game to run. See the [[Cue sheet (.cue)]] for more. | [[Mednafen]] requires you to load games through CUE sheets. Ensure that the CUE sheet is properly set up in order for the game to run. See the [[Cue sheet (.cue)]] for more. | ||
| + | ===Mupen64Plus=== | ||
| + | The following files need to be placed in the System folder: | ||
| + | *RiceVideoLinux.ini | ||
| + | *Glide64mk2.ini | ||
| + | Download them [http://www.mediafire.com/?au459fbk8r86jat here]. | ||
===Super Game Boy=== | ===Super Game Boy=== | ||
| Line 101: | Line 106: | ||
'''S'''ome games like Metal Gear Solid require the disk tray to be opened before changing disks. To do this, change 'Disk Index' to 'No Disk' first. | '''S'''ome games like Metal Gear Solid require the disk tray to be opened before changing disks. To do this, change 'Disk Index' to 'No Disk' first. | ||
| + | [[Category:FAQs]] | ||
==Problems and Solutions== | ==Problems and Solutions== | ||
Revision as of 19:44, 25 September 2013
Work in progress guide. Please expand upon it.
Contents
Windows
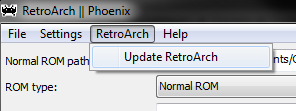
After downloading RetroArch, run 'retroarch-phoenix.exe' and then go to 'RetroArch > Update RetroA
rch' to start downloading emulation cores.
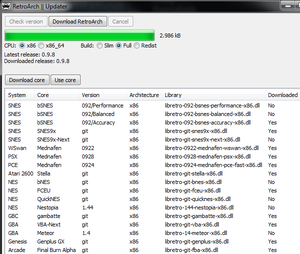
From there, click Check Version. This checks if everything is up-to-date (you have to do this every time you use the updater). Double-click on a core to start downloading it.
To launch a game, select the emulator core you'd like to use under libretro core path, and the appropriate ROM under Normal ROM path. Make sure that 'retroarch.exe' is selected under 'RetroArch path', and click 'Start RetroArch'.
Linux
Ubuntu
First, add the PPA for hunter-kaller/ppa (instructions here), then type the following into a terminal:
sudo apt-get update


sudo apt-get install <corename>
...where <corename> is the name of the package the core is available in. You can see all of the cores available to you either in your package manager (e.g. Synaptic, Software Center) or by visiting Launchpad.
https://launchpad.net/~hunter-kaller/+archive/ppa
Any other distro
You will have to compile from source. For Arch Linux, there are AUR packages that simplify this process, although it is not incredibly difficult otherwise. The most important part is making sure you have all the dependencies.
Dependencies: (refer to your distro's wiki or package manager for exact package names)
- pkgconfig
- OpenGL headers (should be on most distros by default, if not try installing libgl/mesa development package
Optional
- libxml2 - For XML shaders and cheat support
- freetype - TTF font rendering
- ffmpeg/libavcodec - FFmpeg recording
- nvidia-cg-toolkit - Cg shaders
Building from source
Libretro-super is a series of scripts used to ease the compilation and installation of each and every libretro emulation core and RetroArch itself. Thus this is the simplest route to a fully functional installation. If you need or want to build each core individually then you can refer to the build-common.sh script for direction.
git clone git://github.com/libretro/libretro-super.git
cd libretro-super
sh libretro-fetch.sh
sh libretro-build.sh
sh libretro-install.sh <path where you'd like RetroArch installed>
Building Phoenix-GUI (Optional for those that want point-click control)
git clone git://github.com/Themaister/RetroArch-Phoenix.git
cd RetroArch-Phoenix
make # Will build for GTK2 by default. If you're a KDE user or prefer Qt, you can build for Qt with make -f Makefile.qt.
sudo make install
Using RetroArch
RetroArch has a robust CLI for those who prefer the command line, there are also many pages which should have been installed by default for retro-arch, retroarch-joyconfig and others. If you use the CLI be sure to configure your retroarch.cfg file before first use. This config is well commented so each option can be fully understood. Use retroarch-joyconfig command for simplified input setup. RetroArch can auto-detect inputs, which is a great feature to simplify playing with multiple/different controllers (refer to "man retroarch-joyconfig" for details). The retroarch.cfg file should be located in /etc/retroarch.cfg, your home folder or the directory where RetroArch was installed depending on your distro and compilation setup.
For those who prefer the Phoenix-Gui, there are a slew of options - many of which are self explanatory. To keep your RetroArch dir clean and organized, be sure to setup all of the different directories in the General tab. Choose your preferred video and audio options. Map your input options. Make sure you tell Phoenix where to find RetroArch if it doesn't configure automatically. Choose your core and your rom and enjoy.
OSX
????????
Nintendo Wii
If you are on a SD (not HD) CRT TV, then you will have the best display results (proper scanlines) in 512x240 for the NES, and 512x224 for the SNES games, and 640x224 for the Mega Drive/Genesis games.
General Setup
Bios
If you are going to play in a system that needs a BIOS (e.g. PS1), there's a bit more setup required. Go to 'System > General' and change the 'System directory' to wherever you'd like and place the BIOS files in there.
Mednafen is very picky about which BIOS to use. The ones that you might need are:
- scph5500.bin
- scph5501.bin
- scph5502.bin
Mednafen PSX
Mednafen requires you to load games through CUE sheets. Ensure that the CUE sheet is properly set up in order for the game to run. See the Cue sheet (.cue) for more.
Mupen64Plus
The following files need to be placed in the System folder:
- RiceVideoLinux.ini
- Glide64mk2.ini
Download them here.
Super Game Boy
Download these SGB-capable bsnes cores, then download this, place it in the RetroArch folder, and rename it as "sgb.boot.rom". Now on RetroArch, under File > Special ROM, select a Super Game Boy ROM (they will all basically work) and a Game Boy ROM. Finally, under ROM type, select Super GameBoy, make sure you have the bsnes core you downloaded selected, and play.
Dual Analog Controllers
PS1 games often used a set of default remappings if they didn't support it directly. Some games used both analogs as the D-pad, RetroArch doesn't support that though. Dual analogs only work in games that fully supported them, such as Ape Escape. To use dual analog for such games, go to Settings > Controllers, and change it to Dual Analog. Alternatively, open RGUI while in RetroArch and change the gamepad type in the Input options.
Transfer PS1 Memory Card Files
Mednafen creates memory card files for each individual game, whereas to PCSX-R/ePSXe where all game saves are stored into 2 memory card files. To transfer memory card files from PCSX-R/ePSXe to RetroArch:
- Start game in RetroArch.
- Go to system folder. Copy the names of the .mcr files created for the game.
- Delete them.
- Rename the files you want to transfer with the names of the RetroArch memcard files.
- Place the new ones in the system folder.
Disk Changing
To changes disks in-game, go to RGUI > Disk Options > Disk Image Append.
Some games like Metal Gear Solid require the disk tray to be opened before changing disks. To do this, change 'Disk Index' to 'No Disk' first.
Problems and Solutions
32 bit Windows
The 32-bit Windows version of RetroArch crashes. It's a known problem. Download an updated build:
http://forum.themaister.net/viewtopic.php?pid=4945#p4945
NES
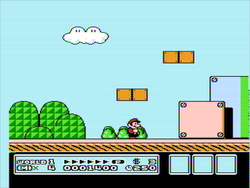
Note: This issue has been fixed in the latest version of the Nestopia/FCEUmm cores. Grab the latest version in the RetroArch updater.
Crop overscan does not work properly in NES games. Even if you turn it on in the options, it has no effect, likely because the NES cores have not been configured to make use of it. While this isn't always a problem, some games such as Super Mario Bros. 3 have blank areas or show garbage on the sides, quirks that would have been hidden on a real TV due to overscan. With the lack of overscan cropping, these blemishes become fully visible. If this bothers you, there are shaders which crop a certain percentage of the edge pixels, such as CRT-Geom.


